How to Install a Kitchen Faucet: A Step-by-Step Guide
Installing a new kitchen faucet can seem like a daunting task, especially if you’re not sure where to start. Many people struggle with the process or worry about causing leaks or damaging their sink.
But don’t worry—you’re not alone, and with a little guidance, you’ll be able to tackle this project confidently.
To install a kitchen faucet, start by gathering your tools and turning off the water supply. Next, disconnect the old faucet, clean the area, and position your new faucet base securely.
Attach the water supply lines tightly, then turn the water back on and check for leaks. If you encounter any drips or loose parts, tighten connections and use plumber’s tape if needed.
Keep following this guide, and you’ll soon master a flawless faucet installation.
Key Takeaways
- Turn off the water supply completely before starting to prevent leaks and water damage.
- Remove the old faucet by disconnecting water lines and unscrewing mounting hardware carefully.
- Align and secure the new faucet base with the sink’s mounting holes using a basin wrench.
- Connect water supply lines tightly and apply plumber’s tape on threaded connections for a watertight seal.
- Turn the water back on slowly, check for leaks, and test the faucet for proper water flow.
Gather Your Tools and Materials
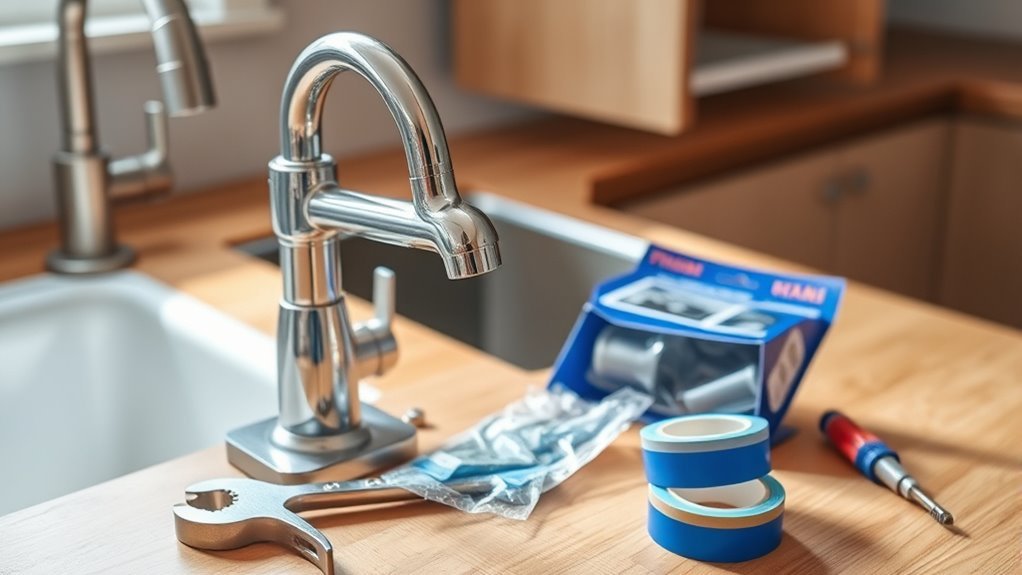
Before you start installing your kitchen faucet, gather all the tools and materials you’ll need to make the process smoother. You should have a basin wrench, adjustable wrench, plumber’s tape, a bucket, and a towel nearby.
These basics cover most faucet types, whether it’s a single-handle or pull-down model. Knowing your faucet type beforehand helps you prepare the right fittings and tools.
Check the instructions on your new faucet for any special tools or parts you might need. Don’t forget to have replacement washers or O-rings ready to prevent leaks.
Organize everything within reach to save time and avoid frustration. Having a flashlight nearby can also help when working in tight spaces under the sink.
How to Turn Off Your Water Supply Safely
Before you dive into installing your new kitchen faucet, it’s a good idea to turn off the water supply first. You’ll want to find the main water valve or the shut-off valve right under the sink. Once you’ve located it, turn it off completely.
After that, give the faucet a quick test to make sure the water has stopped flowing. Just turn on the faucet slightly—you don’t want any surprises when you start working! Once you’re sure there’s no water coming out, you’re all set to proceed with the installation.
Locate Main Water Valve
One essential step to installing a kitchen faucet is locating your main water valve so you can safely shut off the water supply. Knowing where the valve is and what type it is helps you act quickly and avoid water damage.
Main valves can be in different spots depending on your home’s design. For example, you might find it in the basement near the water meter or outside near the water meter.
Other common locations include the crawl space or utility room. Check your valve’s position—if the handle is perpendicular to the pipe, it’s closed.
Familiarize yourself with these details before starting your faucet installation to ensure safety.
Shut Off Local Supply
Turn off your local water supply to prevent leaks and water damage while installing your kitchen faucet. Before you start, make sure to follow key safety steps to protect your home and yourself. Here’s how to shut off the supply safely:
- Find the shut-off valves under your sink. These control the hot and cold water lines separately.
- Turn each valve clockwise until they’re fully closed to stop the water flow completely.
- Open the faucet to drain any leftover water and relieve pressure in the lines.
Following these steps helps you avoid unexpected spills and potential damage. Always double-check that the water is completely shut off before moving on with your faucet installation. Taking these precautions makes the process easier and safer.
Test Water Flow
After shutting off your local water supply, it’s important to test the water flow to make sure the valves are working right and there are no leaks. First, turn on the faucet to see if the water pressure drops to zero or close to zero, which shows the supply is properly shut off.
Watch the flow rate carefully—if water continues to trickle or gush, you might have a faulty valve or an incomplete shutoff. Next, check all visible connections for any signs of leaks or drips. If everything looks dry and the flow is minimal, you’re good to go.
Doing this test now helps prevent unexpected water damage later and makes sure your new faucet installation goes smoothly.
Remove Your Old Kitchen Faucet
Now that you’ve turned off the water supply, you’re all set to take out your old kitchen faucet. First, grab a wrench and disconnect those water lines underneath the sink. Once that’s done, you’ll want to remove any mounting hardware holding the faucet in place. After everything’s loosened and detached, you should be able to lift the old faucet out easily.
Turn Off Water Supply
Before you start removing your old kitchen faucet, make sure to shut off the water supply first. This helps prevent leaks or water damage while you’re working.
Find the shutoff valves under your sink. These control the cold and hot water lines. Turn both valves clockwise until they stop—that cuts off the water supply.
Next, open the faucet to release any remaining water and relieve pressure in the lines. If you can’t find the shutoff valves or they’re stuck, turn off the main water supply for your home.
Shutting off the water properly keeps your workspace dry and safe. It also prevents unexpected flooding when you’re removing your old kitchen faucet.
Disconnect Faucet Connections
Start by loosening the water supply lines connected to your faucet with an adjustable wrench. Turn the nuts counterclockwise until they detach from the faucet.
Next, use your plumbing tools to disconnect any mounting nuts securing the faucet underneath the sink. You might need a basin wrench to reach tight spaces.
Once all the connections are free, carefully lift the old faucet away from the sink. This step is important to avoid damaging the surrounding plumbing or the sink itself.
Keep your plumbing tools organized, as you’ll need them for the installation process.
With the faucet removed, clean the sink area thoroughly before installing your new kitchen faucet.
Clean and Prepare Your Sink Area
Three key steps will help you clean and prepare your sink area efficiently. First, clear out everything around and inside the sink to improve organization. Remove dishes, sponges, and any cleaning products so you can access the entire surface.
Second, use appropriate cleaning products to thoroughly clean the sink basin and surrounding countertop. Focus on removing grime, water stains, and old plumber’s putty or sealant remnants to guarantee a smooth installation surface.
Finally, dry the entire area completely with a clean cloth to prevent moisture from interfering with the faucet’s seal. This step also helps you spot any damage or rust that might need attention before installation.
Following these steps guarantees your sink area is neat, clean, and ready for a new faucet, making the installation process smoother and more effective.
Install Your Kitchen Faucet Base and Secure It
With your sink area clean and dry, you can now install the faucet base. Start by choosing the right materials—metal, plastic, or rubber gaskets—to ensure a good seal.
Place the faucet base onto the sink’s mounting holes and line it up carefully. Then, secure it from underneath with a basin wrench, tightening the nuts evenly.
Make sure not to over-tighten, as this can damage the materials or cause leaks. If your faucet has a rubber gasket or putty, double-check that it’s properly in place to prevent water seepage.
Before fully tightening, double-check that the base feels stable and doesn’t wobble. Proper securing keeps everything stable and protects your sink and countertop from damage.
Once everything is secure, your faucet base is ready for attaching the other parts. It provides a solid foundation for your new kitchen faucet.
Attach Kitchen Faucet Handle and Sprayer
Attach the kitchen faucet handle by aligning it with the base and securing it according to your faucet model’s instructions. Depending on your faucet, you might find different handle types such as single-lever, dual-handle, or touch-activated. Make sure the handle is firmly attached to avoid leaks or loose movement.
Attach the kitchen faucet handle carefully, ensuring proper alignment and a secure fit to prevent leaks or looseness.
Next, think about your sprayer options. Some faucets come with a side sprayer, while others have a pull-down or pull-out sprayer built into the spout. Attach the sprayer hose to the designated connector, making sure it fits tightly.
Follow these key steps to finish this part of the installation:
- Match the handle type to your faucet base and confirm proper alignment.
- Connect the sprayer hose securely to the faucet body or side sprayer outlet.
- Tighten all screws and fittings, but don’t over-tighten to prevent damage.
Connect Kitchen Faucet Water Supply Lines
Now it’s time to hook up the water supply lines to your faucet. Just make sure you’re using the right lines for your setup and tighten everything up good and snug. You don’t want any leaks sneaking in, so double-check that everything’s attached securely.
Once you’ve got everything connected, go ahead and turn the water back on. Keep a close eye on those connections to see if any drips start to show up. If you notice any leaks, just tighten the fittings a little more until it stops.
Choose Correct Supply Lines
Selecting the right supply lines is crucial for a secure and leak-free kitchen faucet installation. Different faucet types might need specific sizes or connections, so it’s important to check compatibility first. Also, think about the supply line materials, as that choice impacts durability and flexibility.
Here’s how to choose the correct supply lines:
- Measure length: Make sure the lines comfortably reach from the shutoff valves to the faucet connections without any tension.
- Match connectors: Ensure the line fittings fit your faucet type, whether it’s compression, threaded, or push-fit.
- Pick materials wisely: Stainless steel braided lines are durable, while flexible plastic lines are easier to maneuver in tight spaces.
Attach Lines Securely
Once you’ve chosen the right supply lines, you’ll want to connect them securely to prevent leaks and ensure steady water flow. Start by aligning the faucet properly to check that the connections sit flush without any strain.
Attach each supply line to the hot and cold faucet inlets, tightening the fittings by hand first. Then, use an adjustable wrench to snug them up, but be careful not to over-tighten, as this can damage the fittings or the lines.
Make sure the lines aren’t kinked or twisted, since that can hurt durability and water flow. Proper faucet alignment helps keep the connection secure and reduces stress on the lines.
Taking these steps carefully will help your kitchen faucet stay leak-free and work efficiently for years to come.
Check For Leaks
Turn on the water supply slowly and watch closely for any leaks around the connections. Proper leak detection is essential to avoid future water damage. As water pressure builds, even small drips can worsen. Here’s how to check effectively:
- Inspect all connection points, including under the sink and at the faucet base, for any signs of moisture.
- Use a dry paper towel or cloth to wipe around fittings; moisture will show up quickly if there’s a leak.
- Turn the faucet on and off several times to monitor if pressure changes cause any new leaks to appear.
If you spot any leaks, tighten connections gently or reseal with plumber’s tape. Confirm no drips remain before finishing your installation.
Test for Leaks and Proper Water Flow
Check all connections carefully as you run the water to verify there are no leaks. Turn on both the hot and cold water valves slowly, observing each joint and hose for signs of moisture. This leak detection step is essential to catch any drips before finalizing the installation.
Next, test the water flow by fully opening the faucet handles. Confirm the water pressure feels steady and strong, without sputtering or uneven flow, which could indicate trapped air or debris. Also, check that the water temperature adjusts smoothly between hot and cold settings.
If the flow is weak or irregular, double-check that the supply lines aren’t kinked or obstructed. Finally, examine under the sink for any hidden leaks during this process.
Taking the time to perform this thorough test for leaks and proper water flow guarantees your new kitchen faucet works flawlessly and prevents future water damage.
Fix Common Installation Issues
If you run into problems during installation, don’t worry—many common issues are easy to fix. Using the right tips and troubleshooting methods can save you time and hassle.
Here are three common problems and how to fix them:
- Leaking Connections: Tighten all fittings with a wrench, but don’t overtighten because it can damage the washers. Use plumber’s tape on threaded connections to ensure a watertight seal.
- Low Water Pressure: Check for clogged aerators or supply lines. Clean or replace any blocked parts to restore proper flow.
- Loose Faucet Base: Make sure the mounting nut under the sink is securely tightened. If the faucet moves, tighten the nut with the right installation tool for your faucet model.
Maintain Your Faucet for Longevity
Addressing installation problems early helps keep your faucet working smoothly, but regular maintenance will make it last even longer. Cleaning your faucet regularly prevents mineral buildup and leaks. It also helps avoid costly repairs down the line.
Checking seals and hoses every few months is a good habit. Cleaning aerators quarterly keeps water flowing freely. If you notice dripping or reduced pressure, act quickly to fix or replace the faulty parts.
| Maintenance Task | Frequency | Tips |
|---|---|---|
| Faucet cleaning | Monthly | Use mild cleaner and avoid abrasives |
| Seal inspection | Every 6 months | Look for cracks or wear |
| Aerator cleaning | Quarterly | Remove and soak in vinegar |
| Hose check | Annually | Replace if cracked or stiff |
| Handle tightening | As needed | Tighten screws to prevent leaks |
Frequently Asked Questions
What Type of Kitchen Faucet Is Best for Hard Water Areas?
You’ll want a kitchen faucet made from durable materials like stainless steel or brass because they resist corrosion caused by hard water. Faucets with ceramic disc valves also handle mineral buildup better.
Since hard water can cause scale, consider pairing your faucet with water softeners to protect it and improve performance.
Choosing the right faucet materials and using water softeners will extend your faucet’s life and keep it functioning smoothly despite hard water challenges.
Can I Install a Kitchen Faucet Without Professional Plumbing Experience?
You don’t need professional plumbing experience to install a kitchen faucet. With the right tools and some DIY tips, you can do it yourself.
Start by turning off the water supply, then gather basic tools like a wrench and plumber’s tape. Following clear instructions and taking your time will help you avoid common mistakes.
Trust your skills—you’ll save money and gain confidence with every step you complete.
How Do I Choose the Right Faucet Style for My Kitchen Design?
You choose the right faucet style by focusing on how it fits with your kitchen’s overall look. Think about how the faucet’s finish matches your cabinets, countertops, and hardware. For example, brushed nickel gives a modern vibe, while oil-rubbed bronze adds a rustic touch.
Next, consider the shape and height of the faucet. Make sure it works well with your sink and your daily tasks. Balancing style and practicality is key to picking a faucet that looks great and functions well every day.
Are There Eco-Friendly Faucet Options to Save Water?
Imagine your faucet as a wise gardener, carefully nurturing every drop. Yes, you can find eco-friendly faucet options that adopt water-saving features like aerators and flow restrictors, helping you conserve without sacrifice.
Many also use eco-friendly materials, like recycled metals or BPA-free plastics, to reduce environmental impact. Choosing one means you’re not just installing a fixture—you’re cultivating a sustainable future right in your kitchen.
What Is the Average Cost of Replacing a Kitchen Faucet?
You’ll typically spend between $150 and $500 to replace a kitchen faucet, depending on the faucet brands you choose and the complexity of the installation. High-end brands cost more but offer durability and style.
You’ll need basic installation tools like a wrench, screwdriver, and plumber’s tape. If you’re handy, you can save by doing it yourself, but hiring a pro might cost an extra $100 to $200 for labor.
Conclusion
Now that you’ve gathered your tools, turned off the water, removed the old faucet, and installed the new one, it’s time to connect the supply lines. Make sure everything is tightened properly to prevent leaks.
Next, turn the water back on and check for any leaks around the connections. If you spot any, tighten the fittings as needed. Once everything looks good, run the faucet to ensure proper flow.
Remember to fix any leaks promptly. Regular maintenance will keep your kitchen faucet functioning smoothly for years to come.
By following these steps carefully, you’re not just installing a kitchen faucet—you’re creating a space that works better, lasts longer, and feels like home.