How to Display Cutting Boards on Kitchen Counter: A Step-by-Step Guide
Many people struggle with keeping their kitchen organized and stylish at the same time. If you’re looking for a practical way to display your cutting boards on your kitchen counter, you’re not alone.
Finding the right balance between accessibility and aesthetic appeal can be a challenge.
To display cutting boards on your kitchen counter, start by choosing boards that match your kitchen’s style and materials. Pick a convenient spot near prep areas, away from sinks to avoid moisture damage.
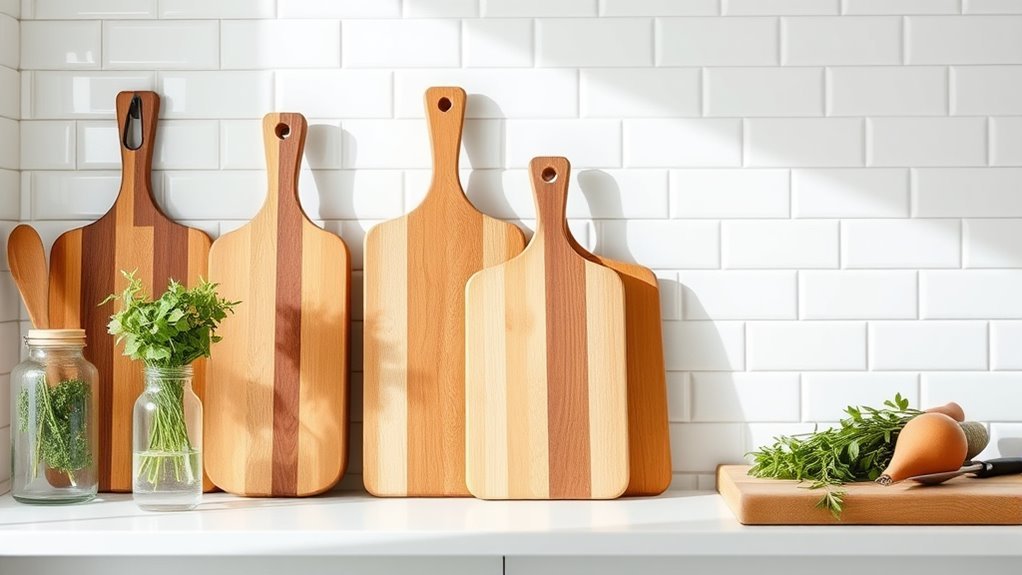
Arrange boards by size and shape, placing the tallest at the back for balance. Use sturdy stands to keep them upright and layer boards of different textures for visual appeal.
Keep them clean and oiled regularly to guarantee longevity.
Investigate these tips to transform your kitchen’s look and functionality.
Key Takeaways
- Pick a handy spot near your prep area or stove, but steer clear of sinks to keep moisture away.
- Use a strong stand made of bamboo or stainless steel to keep your boards upright and easy to grab.
- Arrange your cutting boards by size and shape—larger ones go at the back, smaller ones in front for easy access.
- Mix materials like wood and marble for a nice look, leaning boards against the backsplash or laying them flat.
- Keep everything clean by drying boards thoroughly before display, and once a month, apply mineral oil to your wooden boards to keep them in top shape.
Choose the Right Cutting Boards for Display
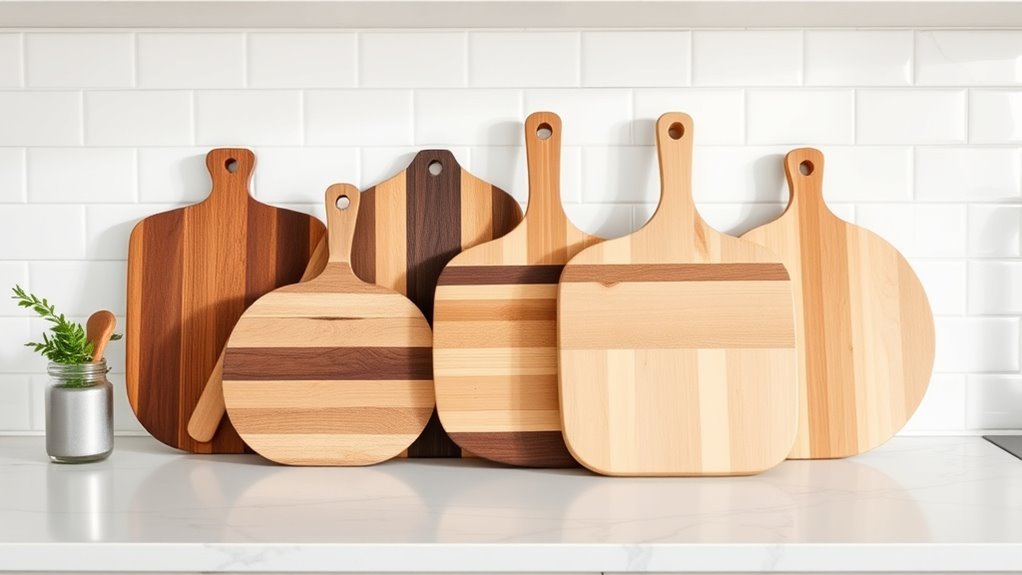
When choosing cutting boards for display, focus on variety and style that complement your kitchen decor. You want boards that not only serve a practical purpose but also improve your space’s aesthetic.
Consider eco-friendly options like bamboo or reclaimed wood, which add warmth and sustainability to your kitchen. These materials stand out and show you care about the environment.
Eco-friendly bamboo and reclaimed wood add warmth while highlighting your commitment to sustainability in the kitchen.
Look for unique designs that catch the eye—whether it’s a board with an interesting grain pattern, an unconventional shape, or artistic inlays. Mixing different shapes and sizes creates visual interest and prevents your display from looking monotonous.
Don’t shy away from combining traditional wooden boards with colorful resin or marble ones if they match your style. The goal is to curate a collection that reflects your personality and complements your kitchen’s color palette and textures.
Pick the Perfect Spot for Cutting Boards
Although cutting boards are practical tools, choosing the right spot to display them can improve your kitchen’s style. When picking the perfect spot, focus on areas that balance convenience with visual appeal. Near your prep area or stove is smart so you can grab a board without disrupting your workflow.
You want your cutting boards to be easy to access but not clutter your counter. Consider spots that contribute to functional aesthetics—places that look good while serving a purpose. Corners or against a backsplash work well, especially if you lean boards upright or use a stylish stand.
Natural light can highlight the wood’s texture, adding warmth to your space. Avoid placing them near the sink to prevent moisture damage and keep your kitchen tidy.
Arrange Cutting Boards by Size and Shape
First, start by sorting your cutting boards by their height. It’s a simple way to make everything look neat and tidy. Once you’ve got them organized by size, try grouping the boards with similar shapes together. That way, your display feels more cohesive and put-together.
And don’t forget to balance things out visually—make sure one side isn’t heavier or more crowded than the other. It’s all about creating a nice, harmonious look that’s both functional and aesthetically pleasing.
Sort By Height
Since cutting boards come in different sizes and shapes, sorting them by height helps keep things neat and easy to access. Start by lining up your boards from tallest to shortest or the other way around.
This variation in height adds visual interest, breaking up the sameness and making each board easier to find. It also makes grabbing the one you need simpler without disturbing the others.
If your display is against a wall, place the tallest boards at the back so nothing gets hidden. If they stand freely, alternate heights to keep the arrangement balanced.
Paying attention to height not only keeps your kitchen counter organized but also turns your cutting boards into a stylish feature.
Group Similar Shapes
When you group cutting boards by size and shape, it makes your collection easier to browse and more visually appealing. Start by sorting boards with similar outlines—rectangular, round, or paddle-shaped—together.
This arrangement highlights shape variety without cluttering the space. By placing similar shapes side by side, you create a sense of order that boosts the overall look of your kitchen counter.
Mixing very different shapes can look chaotic, so keeping related forms close helps maintain a cohesive display. This method also makes it easier to find the right board for your task quickly.
Balance Visual Weight
Arranging your cutting boards by size and shape helps balance their visual weight, creating a harmonious and inviting display. Start by placing the largest boards at the back or center to anchor the arrangement.
Next, layer smaller boards around them so no one piece overpowers the others. Mixing tall, narrow boards with wider, shorter ones adds variety and keeps things interesting.
Keep in mind that uneven groupings often look more appealing than perfect symmetry, as long as the overall balance feels right. By arranging your boards thoughtfully, you make the display feel cohesive and intentional.
This simple step can really enhance your kitchen’s style without adding clutter or chaos. It’s a small change that makes a big difference in showcasing your boards beautifully.
Keep Cutting Boards Upright With Stands
When choosing a stand, make sure it fits your cutting boards’ size and weight so they stay secure. You don’t want them wobbling or falling over every time you reach for one.
Also, it’s a good idea to place the stand on a stable, flat surface. That way, everything stays upright and won’t tip over easily. With the right setup, your cutting boards will stay organized and super easy to grab when you need them.
Choosing The Right Stand
Although cutting boards can stand on their own, choosing the right stand helps keep them upright and organized. When picking a stand, think about different display styles that match your kitchen’s look—whether sleek metal racks or rustic wooden holders.
Material is important too. Go for durable options like stainless steel or bamboo that resist moisture and won’t warp over time. Make sure the stand fits the size and number of your cutting boards snugly to prevent tipping.
Look for designs that allow easy access and good air circulation. This helps keep your boards dry and hygienic. Matching the stand to your cutting boards and kitchen style will create a functional, attractive setup that keeps your workspace tidy and your boards ready to use.
Placement Tips For Stability
Selecting the right stand sets the foundation, but where you place it really makes a difference in keeping your cutting boards stable. Start by choosing a flat, even spot on your kitchen counter to prevent wobbling.
Think about your countertop materials—non-slip surfaces like textured stone or rubber mats can help improve grip. Avoid putting the stand near sinks or stove edges where moisture or heat could affect stability.
You can also add stability by using non-slip pads under the stand or securing it with adhesive strips if needed. Position the stand so the boards don’t lean too far forward or backward, making sure they stay upright without tipping.
Layer Boards for a Stylish, Textured Look
Layering cutting boards creates an eye-catching display that adds depth and texture to your kitchen decor. By using smart layering techniques, you can easily turn a simple countertop into a stylish focal point. Start by picking boards of different sizes and shapes to create visual interest. Then, arrange them so their edges peek out, showing off their unique grains and finishes.
Here’s how to nail the look:
- Place the largest board at the back for a solid base.
- Layer medium boards slightly angled in front to break up monotony.
- Add a small board on top for height and dimension.
- Make sure the boards don’t cover each other completely to keep the texture contrast.
This way, each board’s character shines through, adding a sophisticated, textured appeal to your kitchen without making it look cluttered. Layering cutting boards is an easy trick to boost your space’s style and functionality.
Mix Cutting Board Materials for Contrast
Want to make your cutting board display pop? Mix and match different materials like wood and marble. The warm, natural look of wood gives a cozy, inviting vibe, while the smooth, cool surface of marble adds a touch of modern elegance.
Wood and Marble Pairing
When you combine wood and marble cutting boards, you create a striking visual contrast that enhances your kitchen decor. The rich wood finishes paired with cool marble textures add elegance and warmth to your counter space. To make the most of this pairing, try these tips:
- Choose wood finishes with warm tones to complement the sleek, cool marble textures for a balanced contrast.
- Arrange boards by size and shape, placing a marble board next to a wooden one to highlight their differences.
- Use marble boards for serving and display, while wooden boards handle everyday chopping to keep them looking their best.
- Lean boards against the backsplash or lay them flat, mixing materials to add depth and interest without clutter.
This mix adds style and function effortlessly.
Combining Different Textures
Pairing wood and marble cutting boards shows how contrasting textures can improve your kitchen’s look. When you combine different materials like bamboo, slate, and acrylic, you create textures that add depth and visual interest to your counter space.
Don’t hesitate to mix smooth, polished surfaces with rougher, natural finishes. This contrast not only highlights each board’s unique qualities but also makes your display more dynamic.
Arrange boards with varying thicknesses and edges to boost this effect. By thoughtfully mixing materials, you avoid a flat or monotonous appearance and instead craft a stylish, eye-catching focal point in your kitchen.
Welcome texture combinations to keep your cutting board display fresh, functional, and visually appealing every day.
Keep Cutting Boards Clean and Well-Maintained
Although cutting boards are essential kitchen tools, they need regular cleaning and maintenance to stay safe and work well. Keeping them hygienic protects your food from contamination and helps them last longer.
Here are four simple tips to keep your cutting boards in top shape:
- Clean promptly: Wash your cutting boards with hot, soapy water right after using them to get rid of food residues and bacteria.
- Disinfect regularly: Use a diluted vinegar or hydrogen peroxide solution to sanitize, especially after cutting raw meat or fish.
- Dry thoroughly: Make sure your boards are completely dry before storing to prevent warping or mold growth.
- Oil wooden boards: Once a month, apply food-grade mineral oil to keep the wood hydrated and prevent cracking.
Match Cutting Boards to Your Kitchen’s Style
Keeping your cutting boards clean and well-maintained helps them look their best and makes it easier to match them with your kitchen’s style. When choosing a cutting board, think about your kitchen’s overall look and focus on color coordination.
Whether your kitchen is modern, rustic, or minimalist, the right cutting board can really tie the space together. Here’s a quick guide to help you match cutting boards with your kitchen style:
| Kitchen Style | Ideal Cutting Board Material | Color Palette |
|---|---|---|
| Modern | Bamboo or Acrylic | Neutral tones, black |
| Rustic | Wood (walnut, maple) | Warm browns, earth tones |
| Minimalist | White or light wood | Whites, light greys |
| Eclectic | Mixed materials | Bold colors, patterns |
Display Cutting Boards as Both Decor and Tools
You can transform your cutting boards from everyday kitchen tools into stylish decor with just a few simple display ideas. Balancing functional aesthetics with kitchen organization guarantees your space looks great and stays practical. Here’s how to display cutting boards as both decor and tools:
Transform cutting boards into stylish decor that enhances both kitchen beauty and functionality with simple display ideas.
- Lean Against the Backsplash: Arrange boards of different sizes and materials to create an artistic backdrop. It’s easy to grab one when you need it too.
- Use a Vertical Stand: Keep your boards upright in a sleek rack for quick access. It also gives your kitchen a clean, organized look.
- Hang on Hooks: Install sturdy hooks to showcase decorative boards. This adds texture and character while saving counter space.
- Stack with Style: Neatly stack boards on a countertop corner or shelf. Let their natural wood grains add warmth and charm.
Rotate Cutting Boards Seasonally for Fresh Looks
Displaying your cutting boards creatively not only boosts your kitchen’s style but also invites you to refresh the look regularly. By rotating your cutting boards seasonally, you can introduce fresh vibes that match seasonal themes and improve color coordination.
Swap warm-toned boards in fall for lighter, pastel ones in spring. This simple change keeps your space feeling new and intentional. It’s a fun way to stay inspired and make your kitchen feel fresh.
Here’s a quick guide to seasonal rotation:
| Season | Cutting Board Style |
|---|---|
| Spring | Light wood, pastel hues |
| Summer | Bright colors, tropical |
| Fall | Warm tones, rustic wood |
| Winter | Dark wood, sleek designs |
| Year-round | Neutral tones, versatile |
This rotation helps your space stay lively and guarantees your cutting boards double as functional decor. Give it a try and enjoy a refreshed kitchen every few months!
Frequently Asked Questions
Can Cutting Boards Be Safely Displayed Near the Stove?
You can display cutting boards near the stove, but you should be careful with where you place them to avoid heat damage.
Keep them at a safe distance from burners and hot surfaces to prevent warping or other harm.
If you want them handy, put them on the counter but not right next to the stove.
This way, you protect your boards while keeping your kitchen both functional and stylish.
How Do I Prevent Cutting Boards From Warping Over Time?
To prevent your cutting boards from warping, focus on proper maintenance and humidity control. Many people think soaking them in water helps, but it actually causes swelling and warping.
Instead, keep your boards dry and store them upright in a well-ventilated area. Regularly oil wooden boards to seal moisture and prevent cracks.
Are There Specific Woods Better for Decorative Cutting Boards?
Yes, some woods are better for decorative cutting boards because of their looks and qualities. Hardwoods like maple, walnut, and cherry are great choices because they’re durable and have stunning grain patterns.
You’ll want wood that resists warping and shows off rich colors or interesting textures. Picking the right wood helps you create a functional piece that also adds style to your kitchen.
Can I Use Cutting Boards as Serving Trays?
Yes, you can definitely use cutting boards as serving trays! They add a rustic charm to your presentation. Just make sure your board materials are food-safe and in good condition to avoid splinters or stains.
Woods like maple or walnut are perfect for serving because they’re durable and look appealing. Using cutting boards as trays also makes cleanup easy and enhances your table’s style effortlessly.
How Often Should I Oil Wooden Cutting Boards?
Imagine Sarah, who loves cooking and keeps her wooden cutting boards in good shape by oiling them every month. You should oil your wooden cutting boards about once a month or whenever they look dry.
Regular oiling helps prevent cracking and warping, making it a key part of maintenance. If you use your board often or wash it frequently, consider oiling more often to keep it in top shape and extend its lifespan.
Conclusion
Now that you know how to choose, arrange, and maintain your cutting boards, your kitchen counter is about to change.
But here’s the twist—displaying them isn’t just about practicality or style. It’s about creating a space that tells a story, season by season, board by board.
Ready to see your kitchen in a whole new light? Start arranging your cutting boards and watch how these simple pieces become your next favorite statement.
Remember, showcasing your cutting boards can add charm and personality to your kitchen. So have fun with it and make it uniquely yours!