How to Cook Scallops Perfectly: 8 Methods and Expert Tips That Work
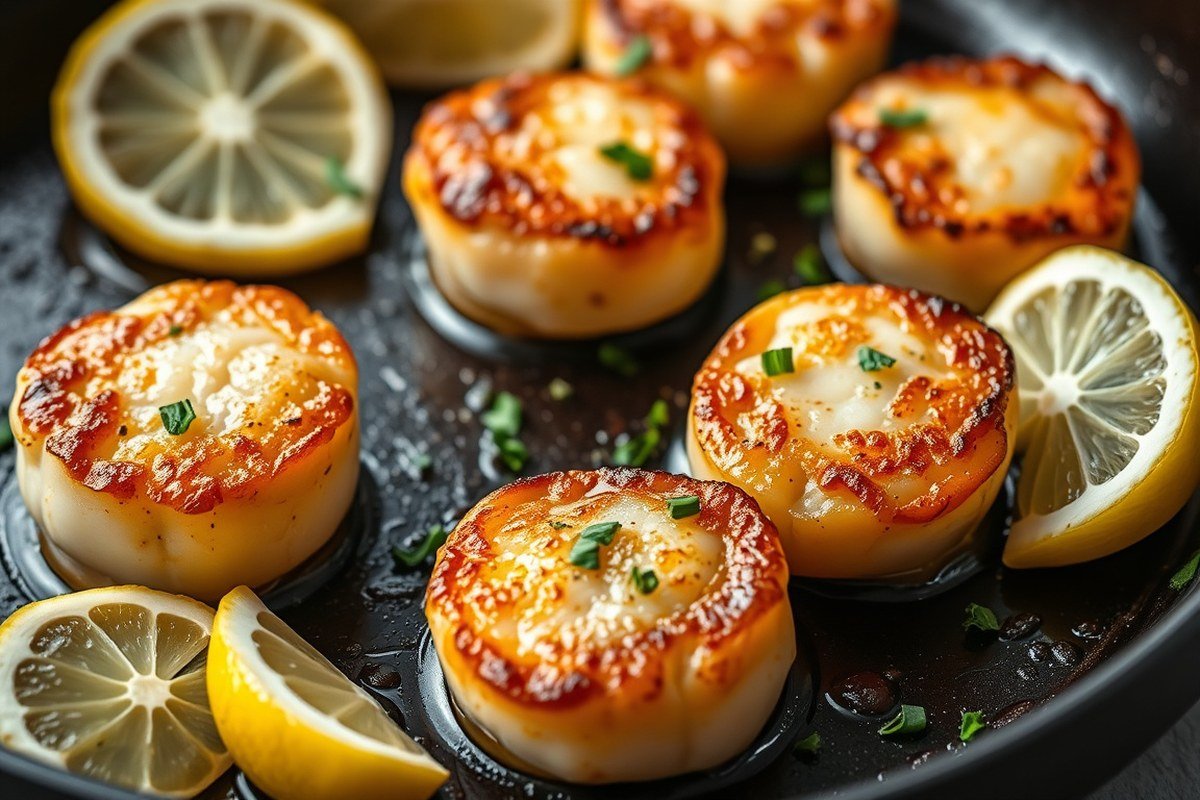
To cook scallops perfectly, pat them dry, season lightly, then pan-sear over high heat without moving them for 2 to 3 minutes to form a golden crust. Flip and cook another 1 to 2 minutes until opaque and firm inside. Enjoy scallops immediately for the best texture and flavor.
This is for home cooks and seafood fans looking to master how to cook scallops with simple, reliable methods. You’ll find clear steps and tips to achieve tender, flavorful scallops every time you cook.
Key Takeaways
- Pat scallops dry with paper towels and chill them uncovered for 15 minutes before cooking to improve searing.
- Use a hot pan and a high-smoke-point oil, such as grapeseed or clarified butter, for a golden crust.
- Cook scallops undisturbed for 2 to 3 minutes before flipping to avoid tearing and ensure even browning.
- Flip scallops once and cook them for 1 to 2 more minutes until the flesh is opaque and firm.
- Preheat the grill or oven before cooking scallops to achieve quick, even cooking and nice sear marks.
- Ensure scallops reach an internal temperature of 145°F to be safely cooked without overcooking.
1. Essential Steps to Prepare Scallops for Cooking
Cleaning, thawing, trimming, and drying scallops correctly sets the foundation for cooking them perfectly. Begin by checking for the side muscle, a small, rectangular patch of tougher tissue on the scallop’s side. This muscle should be removed by gently pulling it away with your fingers; leaving it on can lead to a chewy texture in the final dish.
If you buy frozen scallops, always thaw them completely before cooking to ensure even cooking and safety. The preferred method is to place scallops in the refrigerator for about 24 hours prior to cooking. For a quicker option, put scallops in a sealed plastic bag and submerge them in cool water, changing the water halfway through, which takes roughly 30 minutes. Avoid thawing at room temperature for more than two hours as it risks bacterial growth.
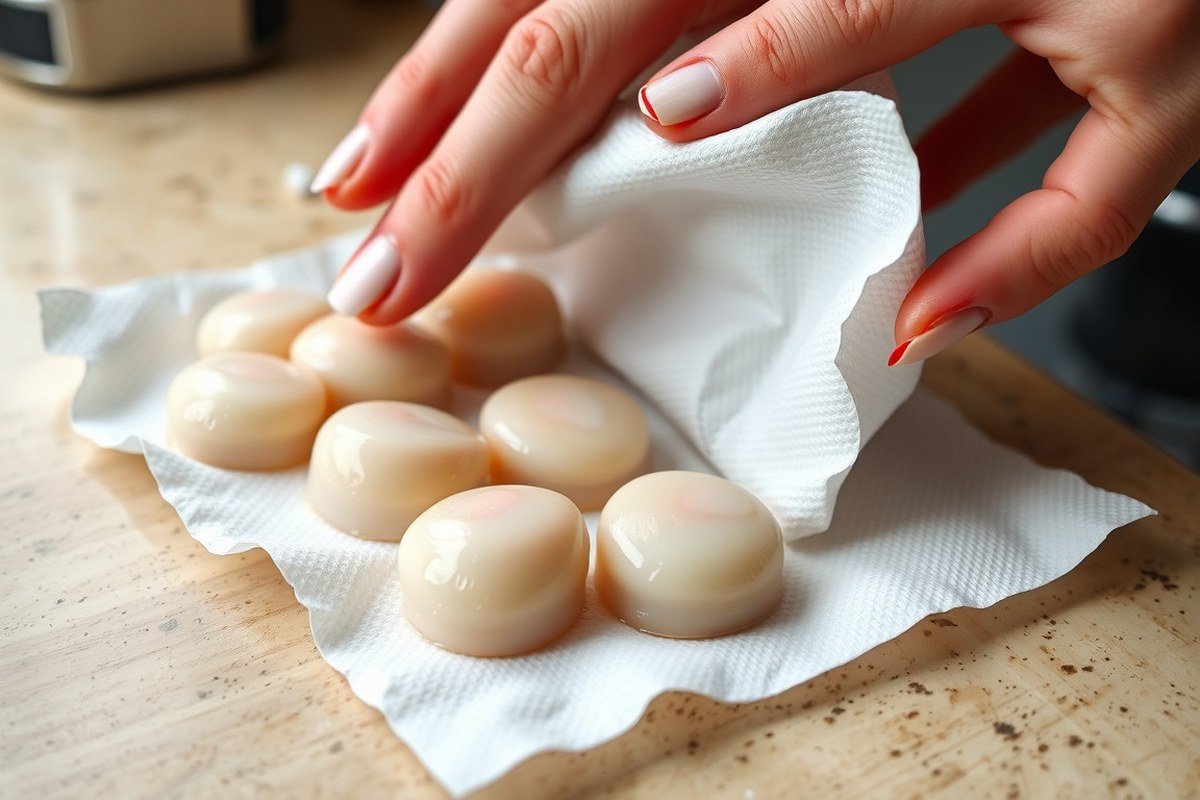
Drying scallops is important. When scallops have excess moisture, they steam instead of sear, preventing the formation of a golden crust and leading to poor texture. Pat thawed or fresh scallops thoroughly with paper towels to remove all surface moisture. This step takes just a minute but makes a big difference during cooking.
- Remove any side muscle by gently pulling it off with your fingers.
- Thaw scallops in the fridge for 24 hours or submerge sealed scallops in cool water for 30 minutes, changing the water once.
- Pat scallops completely dry with clean paper towels before cooking.
- Only thaw the amount you plan to cook to maintain freshness.
- Handle scallops gently to avoid damaging their delicate flesh.
Following these steps ensures scallops cook evenly and develop a desirable golden crust. Skipping the muscle removal can make some bites tough, while cooking scallops that are still frozen or wet usually leads to uneven cooking and prevents browning. Keeping scallops dry and properly thawed also reduces splattering when cooking in hot oil or butter.
2. How to Pan-Sear Scallops for a Perfect Golden Crust

Pan-searing scallops requires a hot pan, the right oil, precise timing, and proper seasoning. You want to create a deep golden crust on one side while keeping the inside tender and slightly translucent. By controlling the heat and watching the scallops carefully, you can achieve that perfect balance.
Choosing the Right Pan and Oil
Use a heavy-bottomed skillet, preferably stainless steel, for even heat distribution and to promote a good sear. Avoid nonstick pans, as they usually don’t get hot enough for a crispy crust. Heat the pan over medium-high to high heat before adding oil.
Choose an oil with a high smoke point, like refined olive oil, grapeseed oil, or avocado oil. These oils can handle the high temperatures needed for searing without burning. A small amount of oil is enough to coat the pan’s surface; too much will prevent browning.
Preparing and Seasoning Scallops
Start with dry-packed, thawed scallops and pat them thoroughly dry to remove excess moisture. Moisture can cause steaming rather than searing. Season only one side lightly with salt and pepper before placing them in the pan.
When you place the scallops seasoned side down in the hot oil, season the top side while they cook. This lets the seasoning stick without drawing out moisture too early. Avoid flour or heavy coatings if you want a clean crust.
Searing Technique and Timing Tips
Heat the pan and oil until shimmering but not smoking, then carefully place the scallops seasoned side down. Leave plenty of space between them to avoid crowding; overcrowding traps steam and prevents browning.
Cook the first side for about 1½ to 2 minutes until an even golden crust forms. Flip the scallops using tongs or a spatula once the crust is fully developed and the scallops release easily from the pan. The second side needs just 30 seconds to 1 minute, enough to finish cooking without overdoing it.
Don’t move the scallops around during searing; patience ensures a crisp crust instead of sticking or tearing.
Finishing Touches with Butter and Herbs
After flipping, reduce the heat to medium and add about 3 tablespoons of butter to the pan. Spoon the melted butter over the scallops as they finish cooking for extra flavor and moisture. Fresh herbs like basil or thyme and a squeeze of lemon juice brighten the taste.
Rest the scallops briefly outside the pan. This allows carryover cooking and helps maintain their tender texture. You can use the leftover butter and pan juices for a simple pan sauce.
- Heat a stainless steel skillet on medium-high until it’s hot but not smoking.
- Add a thin layer of high smoke point oil (about 1 to 2 teaspoons).
- Pat scallops dry and season one side with salt and pepper.
- Place scallops seasoned side down in the hot pan without crowding.
- Cook for 1½ to 2 minutes until a deep golden crust forms; do not move scallops.
- Flip scallops gently and season the other side.
- Add 3 tablespoons butter, lower heat to medium, and baste scallops for 30 seconds to 1 minute.
- Remove scallops from heat and let rest briefly before serving.
3. Comparing Cooking Methods: Pan-Searing, Grilling, Baking, and Frying
The best cooking method for scallops depends on your recipe goals, the scallop size, and your available equipment. Pan-searing offers a fast, flavorful crust, grilling adds a smoky touch but requires careful heat control, baking is gentle and consistent but slower, and frying produces crisp scallops with rich flavor. Cooking times and results vary by method, each with pros and cons to consider before choosing.
Pan-Searing Explained
Pan-searing scallops involves heating a small amount of oil or butter in a skillet over medium-high heat until very hot. Place dry, prepared scallops in the pan without crowding, usually 2 to 3 minutes per side, then flip once to achieve a golden-brown crust. This method is ideal for sea scallops around size U/10 or larger, which can develop a crispy outside while remaining tender inside.
Pan-searing creates a rich flavor and attractive texture quickly, typically under 10 minutes total cooking time. You must keep scallops dry to avoid steaming, and flipping them only once helps develop the crust without overcooking. It’s a good choice when you want a fast, elegant dish, such as lemon garlic scallops served with browned butter.
Grilling Tips and Timing
Grilling scallops adds a smoky flavor and slight char, best suited for larger sea scallops measuring at least U/10, as smaller bay scallops may fall apart. Use a hot grill surface (around 450 to 500°F) and oil the scallops lightly to prevent sticking. Grill scallops about 2 to 3 minutes per side, turning once.
To avoid overcooking, watch the scallops for a firm, opaque center and a temperature near 145°F. Direct heat concentrates flavor but requires attention because grilling scallops takes just a few minutes total. This method works well when paired with outdoor meals or recipes featuring strong, smoky flavors.
Baking Scallops Safely
Baking is a gentler way to cook scallops, especially when topped or baked with additional ingredients like a breadcrumb mixture. Preheat the oven to 375°F and bake scallops for 12 to 15 minutes, adjusting for size. Larger scallops or those coated with toppings tend to take closer to 15 minutes, while smaller bay scallops may cook faster.
Baking delivers even heat, which helps scallops cook through without the risk of burning. This method suits recipes needing uniform cooking or a crispy topping, such as breaded scallops baked with herbs. Using a thermometer to check that the thickest part reaches 145°F ensures safety and prevents dryness.
Frying Scallops Overview
Frying scallops means cooking them in hot oil to get a crisp, golden crust, which makes for a crunchy texture and rich flavor. Deep-frying or shallow-frying typically takes 2 to 4 minutes, depending on scallop size. Coat scallops in flour or batter for best results, then fry in oil heated to 350 to 375°F.
The benefits of frying include a quick cook time and a distinct crunch, making fried scallops stand out in dishes like seafood platters or fried appetizers. However, frying adds calories and requires more cleanup. Use this method when texture contrast is a priority and for smaller scallops that cook quickly. Below is a comparison table summarizing key details for each scallop cooking method:
| Method | Ideal Scallop Size | Cooking Time | Typical Temperature | Key Advantages | Common Challenges |
|---|---|---|---|---|---|
| Pan-searing | Sea scallops (U/10 and larger) | 2-3 minutes per side | Medium-high heat (375-450°F pan temperature) | Quick crust, rich flavor | Moisture causes steaming, crowding reduces browning |
| Grilling | Sea scallops (U/10 and larger) | 2-3 minutes per side | 450-500°F grill | Smoky flavor, slight char | Can dry out quickly, smaller scallops can fall through grates |
| Baking | Any size, often with toppings | 12-15 minutes | 375°F oven | Even cooking, safe and gentle | Longer cooking time, less crust development |
| Frying | Small to medium scallops | 2-4 minutes total | 350-375°F oil | Crispy texture, fast | Higher calorie count, oil cleanup |
Choosing a method depends on the scallop size and desired outcome. Use pan-searing for medium to large scallops when a crust and fast cook time matter. Opt for grilling to add smoky notes to large scallops suitable for outdoor cooking. Baking suits recipes requiring even cooking or toppings, especially with smaller or varied sizes. Fry scallops when you want crispiness and rich texture, ideal for appetizers or crunchy dishes.
4. How to Tell When Scallops Are Cooked Perfectly
Scallops are perfectly cooked when their internal temperature reaches about 125°F. At this point, the scallop is opaque throughout but still retains its tender, buttery texture. Cooking beyond this temperature risks drying them out and making them rubbery. Use an instant-read thermometer inserted into the thickest part of the scallop to check doneness quickly and accurately.
Visually, perfectly cooked scallops have a deep golden-brown crust on both flat sides. This crust forms from quick, high-heat cooking like pan-searing or grilling. A browned crust alone doesn’t confirm the scallop is done internally, so rely on texture and temperature as your guides. The scallop’s inside should look opaque rather than translucent, indicating it’s cooked through without being overdone.
Feel the scallop gently with your fingertip or a fork once seared. It should offer a slight give, feeling firm but not hard or rubbery. Properly cooked scallops feel springy, not mushy or overly dense. Pressing testing for just a second during cooking can help you decide if they need a little more time. For example, bay scallops usually cook faster, generally 1 to 2 minutes per side, while larger sea scallops might take 2 to 3 minutes per side depending on thickness.
A timing rule of thumb is to cook scallops for about 2 minutes per side over medium-high heat, adjusting for thickness and pan temperature. Scallops should sizzle when they touch the pan but avoid burning. The ideal balance is reached when the outside is caramelized and the inside hits 125°F. Overcooking just 30 seconds past this can quickly cause toughness and a rubbery mouthfeel.
To avoid undercooked scallops, make sure they reach full opacity inside and feel slightly firm. Scallops with a translucent center need a little more cooking, but be cautious about adding time in small increments. Without a thermometer, check doneness by appearance and texture, aiming for slightly undercooked since residual heat will finish cooking after you remove them.
Factors like scallop thickness, whether they are cold from the fridge, and pan heat can cause variation in cooking time. Thicker scallops require more time, but gently monitoring temperature and firmness will guide you. Avoid overcrowding the pan, which lowers the temperature and increases cooking time unpredictably.
Focus on a golden crust, an internal temperature close to 125°F, and a texture that feels lightly springy. This combination delivers tender, juicy scallops without the common mistake of a rubbery texture that comes from overcooking. Taking a moment to check temperature and press gently can help you serve scallops with confidence.
5. Common Scallop Cooking Mistakes and How to Fix Them
Scallops often become rubbery when they’re overcooked. Since they have very little fat, it’s easy for scallops to lose moisture quickly if they stay on heat too long. To prevent this, cook them over high heat for just 2 to 3 minutes per side until they develop a golden crust. Removing scallops from the pan as soon as they’re opaque helps keep them tender and juicy.
Overcrowding the pan causes scallops to steam instead of sear. When too many scallops are placed close together, the heat drops and released moisture from the scallops doesn’t evaporate fast enough. This results in a wet, pale surface rather than a crisp, browned one. Use a large pan or cook in batches so each scallop has enough space and contact with the hot surface.
Surface moisture on scallops is another major reason searing fails. Any water left on the scallop’s surface will boil and create steam in the pan, preventing browning. Pat scallops very dry with paper towels before cooking. This is especially important for wet-packed scallops, which hold more moisture. If you buy frozen scallops, let ice crystals melt and pat them dry thoroughly before searing.
To salvage slightly overcooked scallops, try removing them quickly from heat and serving with a moist sauce or butter that adds softness back. They won’t become tender again, but a rich sauce can balance dryness. When seasoning, do it just before cooking. Salt draws moisture out, so salting scallops too early causes them to release water and steam rather than sear.
- Pat scallops dry before cooking to reduce moisture
- Use high heat and avoid moving scallops for 2 to 3 minutes per side
- Give scallops space by not overcrowding the pan
- Season scallops right before placing them in the pan
- Remove scallops from heat as soon as they turn opaque
- Serve overcooked scallops with a moist sauce to improve texture
Moving scallops too soon tears away the crust and causes them to stick; wait until they release naturally before flipping.
Managing moisture and heat is key to perfect scallops. Excess water not only prevents browning but can also cause scorched oil spots or uneven cooking. Use a hot pan, dry scallops, and a confident, undisturbed sear for the best results.
6. Improving Flavor: Seasoning, Sauces, and Finishing Touches
Scallops have a natural sweetness that pairs well with simple, fresh flavors. Using herbs like parsley or basil, mild spices, and bright citrus can improve their taste without overpowering it. Butter-based sauces and wrapping scallops in bacon add richness and complementary textures that improve your dish.
Common Seasoning Blends
Keeping seasonings light lets scallops shine. Basic salt and pepper are essential, while garlic and fresh herbs like parsley, basil, or chives add a subtle aromatic lift. A sprinkle of paprika or Grill Mates® Roasted Garlic & Herb Seasoning brings mild warmth that blends well with the seafood’s sweetness.
For bay scallops, which are smaller and tender, seasoning lightly before adding them to pasta or chowder works best. For larger sea scallops, simply pat dry, season with salt and pepper, and add a pinch of lemon zest or fresh herbs after cooking for freshness.
Making a Lemon Butter Pan Sauce
A quick lemon butter pan sauce brightens the plate and complements scallops perfectly. Using the fond (browned bits) from searing scallops introduces rich, deep flavor. The sauce comes together in minutes with common pantry ingredients. Follow these steps for a fast pan sauce:
- Remove seared scallops from the pan and set aside, keeping them warm.
- Lower heat to medium and add 2 tablespoons of unsalted butter to the pan.
- Add 1 thinly sliced garlic clove, stirring for about 30 seconds until fragrant but not browned.
- Pour in 1/4 cup dry white wine or chicken broth to deglaze the pan, scraping up browned bits from the bottom.
- Simmer until liquid reduces by half, about 2 to 3 minutes.
- Stir in the juice of half a lemon and 1 tablespoon chopped fresh chives or basil.
- Return the scallops briefly to the pan, off the heat, to coat them lightly in the sauce.
- Serve immediately, spooning sauce over the scallops and scattering extra herbs on top.
This process costs minimal ingredients and less than 10 minutes. Using butter adds silkiness, while lemon juice balances with acidity. Avoid overcooking scallops when reheating in the sauce to keep them tender.
Using Compound Butter for Finishing
Compound butters are softened butter blended with flavorings like herbs, garlic, lemon zest, or spices. Adding a pat of compound butter on top of hot scallops just before serving creates a rich, glossy finish that melts into the seafood.
Prepare compound butter by mixing equal parts unsalted butter (softened) and finely chopped garlic, parsley, and basil, plus a teaspoon of lemon zest. Chill the mixture for 30 minutes so it firms up, then slice into rounds to store. Use a tablespoon per serving.
After cooking, place a slice on the scallops off the heat to melt slowly, adding moisture and layers of flavor. This technique lets you customize finishing touches to taste without fiddling by the stove.
Wrapping Scallops in Bacon or Prosciutto
Wrapping scallops in bacon or prosciutto adds smoky, salty notes and a crispy texture that contrasts with tender seafood. Choose thin bacon or prosciutto slices for even cooking without overpowering the scallops’ sweetness.
Season scallops lightly with salt and pepper. Wrap each scallop with a thin slice of bacon or prosciutto, securing with a toothpick if needed. Sear or grill over medium-high heat for 2 to 3 minutes per side until bacon crisps and scallops develop a golden crust. Avoid overcrowding the pan to ensure even cooking.
This method works well for appetizers or skewers, like scallops seasoned boldly with Roasted Garlic & Herb Seasoning then wrapped and cooked until juicy and flavorful. The key is balancing the smoky, salty wrapper with the naturally sweet, tender scallop within.
7. Adapting Cooking for Different Types and Sizes of Scallops
Bay scallops are much smaller than sea scallops, typically the size of a dime. Their tender texture and naturally sweet flavor mean they cook very quickly, usually in just 1 to 2 minutes per side. Sea scallops, being larger and meatier, require more time. Dry-packed sea scallops generally weigh between 2 to 3 ounces each and take about 2 to 3 minutes per side when pan-seared. Jumbo sea scallops, which may weigh around 4 ounces or more, need a slightly longer cook time, around 3 to 4 minutes per side, to ensure the center is done without overcooking the exterior.
Frozen scallops can be cooked with similar methods as fresh, but for best texture, thaw them slowly in the refrigerator overnight. This prevents excess moisture that causes uneven searing and a rubbery texture. Dry-packed scallops, common for sea scallops, have no preservatives and minimal moisture added, which helps them sear to a better crust compared to wet-packed scallops that contain added sodium tripolyphosphate. The dry-packed variety demands careful drying on paper towels before cooking to achieve a perfect sear.
| Scallop Type | Average Size | Recommended Cook Time per Side | Key Considerations |
|---|---|---|---|
| Bay Scallops | ~1 inch diameter (dime-sized) | 1, 2 minutes | Cook very briefly; tender and sweet; pat dry before cooking |
| Sea Scallops (Standard) | 2, 3 ounces each (about 1.5 inches diameter) | 2, 3 minutes | Use dry-packed when possible; dry scallops well; thaw overnight if frozen |
| Jumbo Sea Scallops | 4 ounces or more | 3, 4 minutes | Longer cook time needed; watch to prevent toughness; dry well before cooking |
| Frozen Scallops | Varies (usually sea scallops) | Same as fresh, but must thaw overnight | Do not cook frozen directly; thaw slowly to preserve texture |
As a general rule, smaller scallops benefit from high heat and quick cooking to keep them tender and juicy. Larger scallops allow a bit more leeway to cook through without drying out, but achieving a golden crust while keeping the center moist remains essential. Overcooking scallops of any size results in a rubbery or dry texture, often because of too much heat or cooking time. Using dry-packed scallops when available makes it easier to get a crisp, flavorful sear. When cooking frozen scallops, avoid rushing the thawing process; a slow defrost in the refrigerator up to 24 hours prior ensures the scallops maintain a firm texture and even cooking.
8. Storage and Reheating Techniques to Keep Scallops Tender
Cooked scallops can stay fresh in the refrigerator for up to 3 days when stored properly. Place them in an airtight container or wrap tightly with plastic wrap to prevent exposure to air and moisture loss. Keep the container on the middle or lower shelves of the fridge, where the temperature stays more consistent, ideally below 40°F.
To avoid chewy scallops during reheating, warm them gently and quickly. The best method is to reheat scallops in a skillet over low heat with a splash of butter or oil. Heat for about 1 to 2 minutes per side or until just warmed through, without overcooking. Avoid microwaving, which can easily dry out scallops and make them rubbery, or reheating at high heat, which causes toughness.
If you want to freeze cooked scallops, make sure they cool completely first. Wrap them tightly in plastic wrap, then place in an airtight freezer bag or container to reduce freezer burn. Frozen cooked scallops should be used within 1 to 2 months for good quality. Thaw them in the refrigerator overnight and reheat using the gentle method described above.
Scallops tend to lose moisture when reheated because their proteins contract with heat, squeezing out water. To keep scallops tender, avoid reheating repeatedly or for too long. Adding a little bit of liquid, such as broth or lemon juice, while reheating can help maintain moisture. Reheating slowly and gently allows the scallops to warm without toughening.
Reheat scallops over low heat in a skillet with a small amount of butter to restore moisture and prevent a chewy texture.
In situations where you need to cool scallops quickly before storing, placing scallops in sealed packaging and submerging them in cold water for 20 to 30 minutes can speed cooling and limit bacteria growth. This method is useful after cooking multiple scallops for a gathering.
Remember, overcooking is the main cause of toughness in both fresh and reheated scallops. Cooked scallops that have been stored properly but taste dry or chewy are often overheated during reheating. Careful temperature control and timing are your best tools to keep them tender and flavorful after storage.
Step-by-Step Action Plan for Cooking Scallops
Follow these clear actions to prepare and cook scallops perfectly every time, whether you pan-sear, grill, bake, or fry them.
- Before you start: Pat scallops dry with paper towels to remove excess moisture, which helps achieve a golden crust during cooking.
- 5 minutes before cooking: Season scallops lightly with salt and pepper to improve their natural flavor without overwhelming them.
- During cooking: Use a hot, lightly oiled pan for pan-searing or preheated grill grates for grilling; cook scallops about 2-3 minutes per side until opaque and firm.
- Immediately after cooking: Remove scallops from heat and let them rest for 1-2 minutes to retain juices and tenderness.
- Right away: Add finishing touches like a squeeze of lemon juice or a drizzle of browned butter sauce to boost flavor without overpowering.
- If storing leftovers: Cool scallops quickly in the refrigerator within 2 hours and store in an airtight container to keep them tender.
- When reheating: Warm scallops gently in a skillet over low heat or in the oven under 250°F to avoid overcooking.
Frequently Asked Questions
What Is the Best Method of Cooking Scallops?
Pan-searing scallops is the best method to achieve a golden crust and tender inside. Cooking them quickly over high heat ensures they stay juicy and flavorful without getting rubbery.
Is It Better to Pan Fry or Bake Scallops?
Pan frying gives scallops a crisp, golden exterior and cooks them faster, usually within 5 minutes. Baking takes longer and works better for larger scallops or batch cooking, but you lose some crispness.
How Do You Cook Scallops in a Frying Pan?
Preheat a pan until it is extremely hot, add butter or oil, then arrange the scallops in a single layer with space between them. Let them cook without moving for 2 to 3 minutes until a rich golden crust develops, then turn them over and cook for an additional 1 to 2 minutes.
What Not to Do When Cooking Scallops?
Avoid overcrowding the pan and flipping scallops too often. Too many scallops or moving them around prevents browning and can make them soggy. Let scallops cook undisturbed so they release naturally from the pan.
Can Scallops Be Cooked from Frozen?
It’s best to thaw scallops in the fridge for 24 hours before cooking to ensure even cooking and a better sear.
Should You Rinse Scallops Before Cooking?
Rinsing scallops is not necessary and adds moisture, which can prevent a proper sear. Pat them dry thoroughly instead for a better crust.
Wrapping Up
Perfectly cooking scallops starts with drying and seasoning them simply, followed by careful temperature control throughout cooking. Your next step is to try pan-searing a small batch using these steps to get comfortable with the timing and heat, building your confidence before experimenting with other methods or sauces.



3 Comments